This article explains what sidechaining is, and how to sidechain in Ableton Live 11. We’ll give step-by-step instructions for four sidechaining methods with ableton stock plugins. Sidechaining will help you avoid muddy mixes with clashing elements, and it’s the best way to ensure your kick drum and bass have their own space. You’ve definitely heard sidechaining at work in your favorite music, so let’s dive in!
Table of Contents
How to Sidechain in Ableton
There are many methods of sidechaining that all use the same basic steps: First, load your preferred sidechain utility on the instrument you want to duck. Next, activate the sidechain function and choose an instrument to trigger the effect. Finally adjust the settings to produce the desired ducking effect.
What is Sidechaining?
Put simply, sidechaining is the process of using one signal to trigger and control an effect on another signal. Typically, the signal that is being used to trigger the second signal is called the “key” or “source” signal, while the signal that is being triggered is called the “sidechain” signal.
Sidechaining is most often used to “duck” (lower the volume of) one signal when another signal is played. In electronic and pop music production, this is most commonly used to duck a bass sound using the kick drum as the trigger. When the kick drum hits, the bass is lowered in volume, making space for one another and creating a pumping effect.
But, many plugins and effects have sidechain capabilities that use these same concepts. Let’s explore why below.
Why Sidechain?
Sidechaining is a fundamental music production technique. It has applications ranging from tactical mixing to sound design.
Sidechaining is primarily used as a mixing tool – to make sure that overlapping sounds don’t clash with one another. Electronic and pop music producers use sidechaining to make room for the kick drum and bass. Since these two instruments both occupy the same low-end frequency spectrum, sidechaining your bass to the kick lowers your bass volume temporarily to make room for the kick. This is essential for making sure nothing gets in the way of your kick drum, which is the backbone of a lot of electronic music.
Sometimes, elements in the same frequency range can cause phasing issues, too. Sidechaining addresses this the same way it does frequency masking issues.
Sidechaining can be used to control elements with long tails. Delay, echoes, and reverbs, can all get in the way of the focus of your mix. Sidechaining is a great way to make sure they are out of the way when they need to be.
Sidechaining can also be used for other creative reasons. It can create a pumping effect on sounds like synth lines and pad chords. Artists like Daft Punk are famous for this sound. This technique can add a lot of energy and movement to a track.
Because your sidechain only depends on the input signal and not its volume, you can even use silenced tracks as a trigger. Experimenting with sidechaining elements to shorter or longer samples can produce unique rhythms. There are no limits or rules to sidechain routing or settings, so the possibilities are endless.
How to Sidechain in Ableton 11
Now that we’ve gone over what sidechaining is and why you might want to use it in your productions, let’s get into how to actually do it in Ableton Live.
If you don’t have Ableton, you can download a free 90-day trial.
We’ll explore 4 different ways of sidechaining using Ableton stock plugins, learning each with the prime example of sidechaining a bassline to a kick drum trigger.
- Using Ableton Live’s Compressor
- Using Ableton Live’s Utility
- Using Ableton Live’s Auto Pan
- Using Fades in Ableton Live
Sidechain in Ableton with the Compressor
Using a compressor is one of the most common ways to sidechain. It’s so common that “Sidechain Compression” is often used interchangeably with “Sidechaining.”
Any instrument can be sidechained. Often, things like your kick and bass, or synths, guitars, and vocals have frequencies that overlap one another. Those clashes can create “mud” that negatively affects the clarity and presence of the other elements.
Sidechain compression is a mixing tool that will give you greater control over which instruments occupy what frequencies and when.
Follow the steps below to set up sidechain compression.
Or, make your own file. You’ll just need two tracks: a kick track with “four on the floor” kick drum we’ll use as a trigger, and a synth or bass track that we will sidechain.
Place Ableton's Compressor on a Synth or Bass Track

This can be either an audio or midi track. You can even apply the compressor on a group (sometimes called a “bus” by people who work in other DAWs).
Note, you can also do everything below with Ableton’s “Glue Compressor.”
Activate Sidechaining
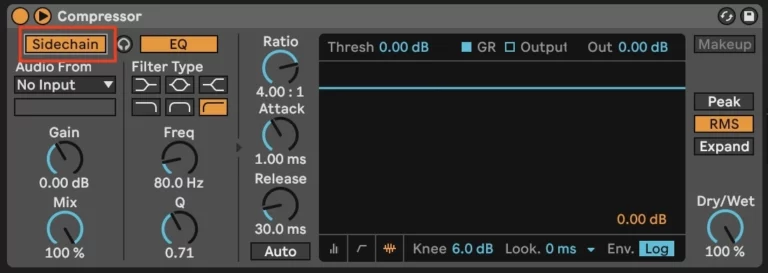
Expand the compressor options by clicking the ▼ symbol to the left of the text “Compressor” to reveal the sidechain panel.
Click the “Sidechain” button to activate it, turning it yellow. Activating sidechaining now lets you choose your trigger signal using the “Audio From” source.
Select a Trigger

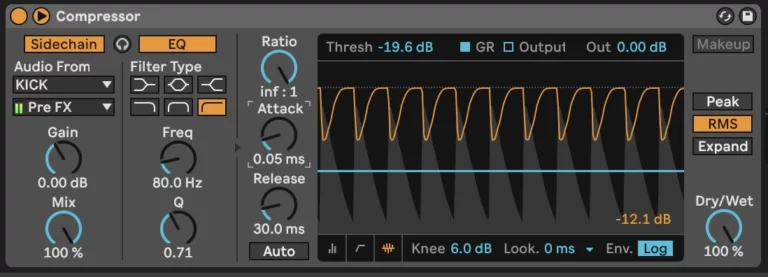
In the “Audio From” dropdown, pick the channel you would like to trigger the sidechain. For our example, we’ll pick the “KICK” track. Every time the Kick plays, the synths’s volume will lower, or “duck.”
You will also have three options for where in the trigger tracks signal chain the trigger actually occurs.
- Pre FX: The signal before the track’s chain and mixer. This is the original audio signal, completely unprocessed.
- Post FX: The signal after the track’s device chain. This is the audio processed by any plugins on the track.
- Post Mixer: The final output from a track, after it passes through all plugins and the mixer.
Pre FX is the most common as it gives a clean signal, which is typically tighter and yields a more precise result on the sidechained track.
Fine-Tune the Ducking
The four main settings that control any compressor are:
- Ratio: How much ducking occurs. Technically, this is the amount of compression (measured by gain reduction) that is applied when the signal passes a certain threshold.
- Threshold: Where the compression begins. The threshold is the dB level the signal must exceed to be compressed. Any signal above this level will get compressed.
- Attack: How fast the compression starts (in ms) once the signal passes a threshold.
- Release: How fast the compression stops (in ms) once the signal falls below the threshold.
To illustrate this example, set the ratio all the way to the right, to inf:1, which effectively blocks the signal from crossing the threshold. This is also called limiting.
Now, lower the threshold until you get the desired pumping sound.
Fine tune by adjusting the Attack and Release to taste.
Other Ways to Sidechain in Ableton
Now that we’ve covered the basics of sidechain compression, we want to show other ways to achieve a similar effect using Ableton’s stock plugins.
These techniques will “duck” the audio volume in a specified, and automated way.
These other methods are technically not sidechaining, because they don’t use an external track as a trigger to duck a source. But, for achieving the desired pumping effect – especially for making space for both a kick drum and bass – they can be fantastic tools.
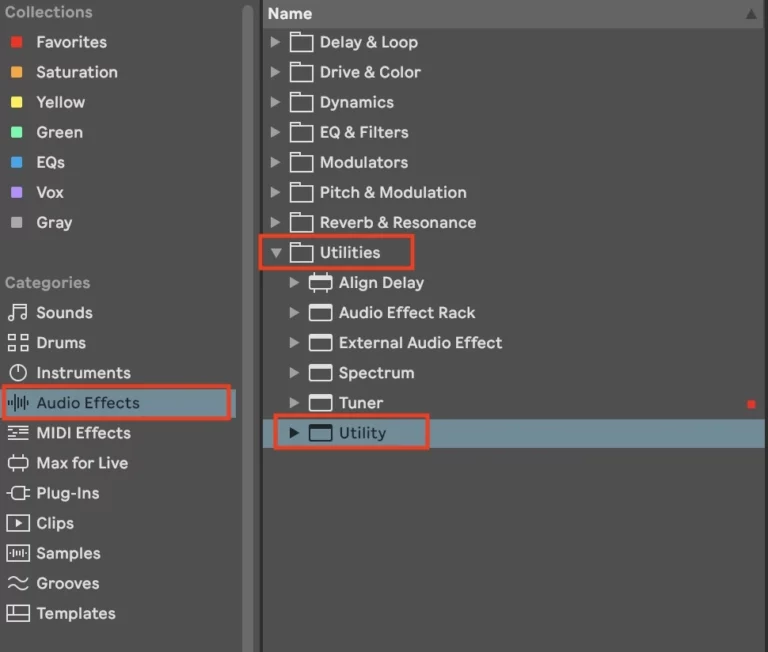
Sidechain in Ableton with Utility
Ableton’s Utility is a fantastic tool that combines several functions that are usually found in the “channel” strip on a physical console.
One of these functions is “gain.” If you’ve been following along, you may remember we used Ableton’s compressor to apply gain reduction to our signal.
Here, we’ll use the utility to achieve the same effect.
Place Ableton's Utility on a Synth or Bass Track
Activate Automation Mode
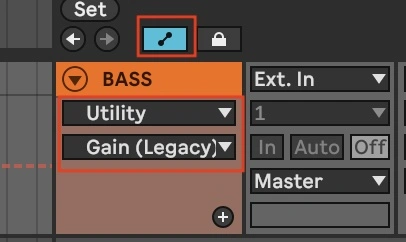
Click the “Gain” knob and Press “A” on your keyboard or click the automation mode button to open the automation lane.
Make sure “Utility” and “Gain” are selected from the dropdown.
Note, if your keyboard isn’t working, try pressing “M” first to make sure you aren’t in Midi input mode.
Draw a Gain Automation Curve
Click on the dashed line to add automation points.
In this example we’ll add 3:
- Start: At the normal volume
- Duck: Drop the volume to 0db to duck
- End: Return to the normal volume

Now you can hold the “alt” or “option” key on your keyboards and drag the line up and down with your mouse to draw the automation curve.
It may help to zoom in so you can draw this curve so that it matches up with your midi or audio kick drum.
Copy and Paste

You can highlight this curve in the automation lane and copy and paste it wherever you need it on the track.
Alternately, if you “unlock envelopes”, the automation curve will follow the clip itself. So, if you move the audio clip or copy and paste it, the same automation curve will follow.

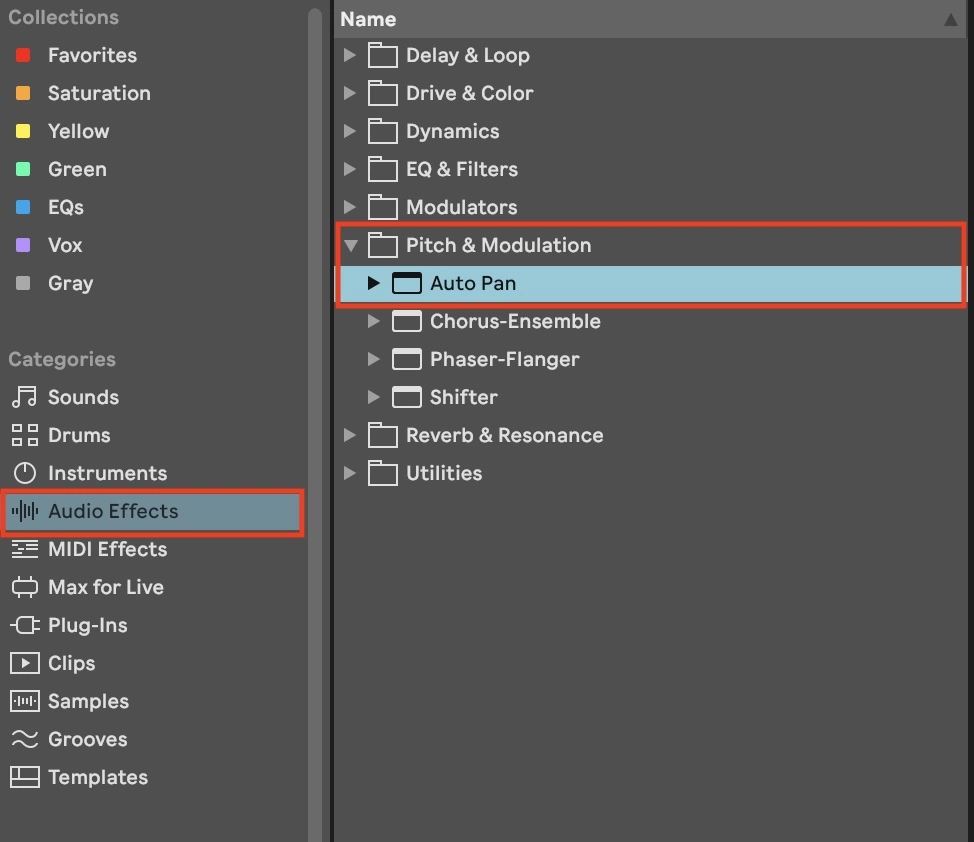
Sidechain in Ableton with Auto Pan
For an outside-the-box application of a common effect, we can use the same methodology to achieve a pumping effect with Ableton’s Auto Pan.
This device is usually used to automatically move a signal left and right through the stereo field. But, by tweaking it’s settings we can achieve a sidechain effect.
Place Ableton's Auto Pan on a Track
Set the Amount to 100%
This will achieve a complete duck of the sound.
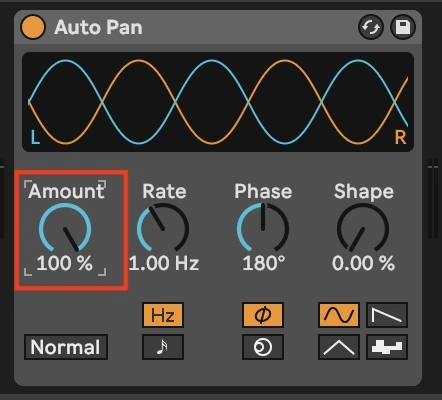
Turn the Phase Up
Set the phase all the way up or down. It doesn’t matter which. Either extreme moves both the left and right audio channels together in unison. You’ll see that the two curves representing the channels now appear as one.

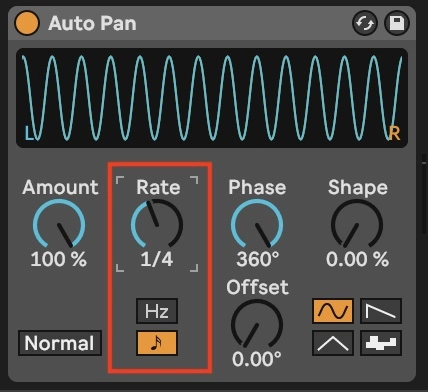
Set the Rate
For simplicity you can use the sync to the tempo and select ¼ notes. For a four on the floor beat this will align with your kick drum.
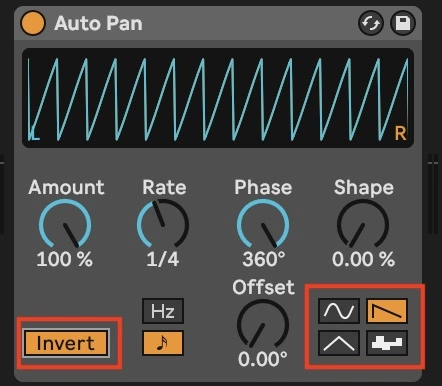
Set the LFO
Select the triangle LFO waveform and invert it by clicking the “Normal” button to toggle to “Invert.” This will make it so instead of starting at the top of the auto pan peak, it will start at the bottom.
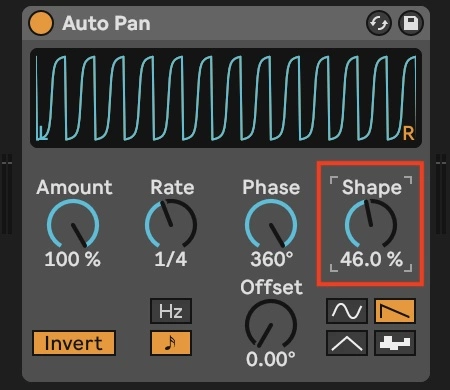
Shape the Ducking
Adjust the “Shape” to get the desired pumping effect.
Sidechain in Ableton with Clip Fades
Fades are a feature introduced in Ableton 10. Designed to eliminate clicks and pops on audio tracks, Fades allow you to manually draw in a gain curve at the start or end of audio clips.
It’s a time-intensive and manual process, but it can yield very precise results when you use it.
To edit fades you’ll have to deactivate automation mode.

You can manually adjust the length of the Fades by dragging the square icon in the top left or right of an audio clip.

You can then click and drag the midpoint of that fade to adjust the intensity of the curve.
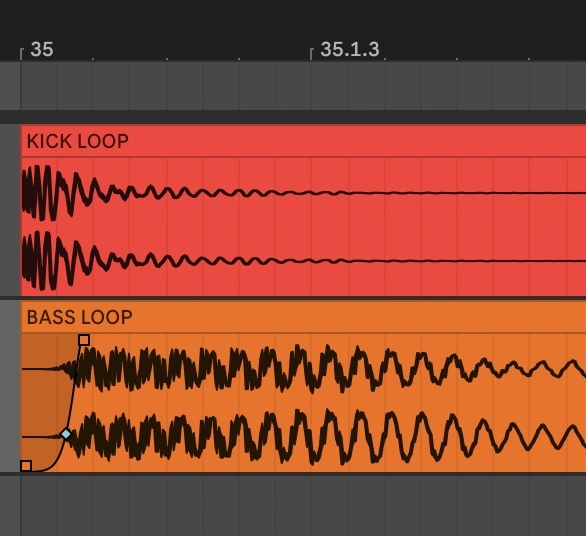
As with our other methods, it may be helpful to align the audio clip to your kick drum, so you can get the precise ducking via the fade that you want.
Summary
Knowing how to sidechain in Ableton Live is critical for producing clean, professional sounding mixes. Sidechaining is one of the most powerful tools a producer has to add depth and dimension to tracks.
Most electronic and pop music producers will use these techniques to sidechain their bass to their kick, making sure the low end frequencies in their track are clean.
A music producer might sidechain other elements of their mix. Lead vocals, snare drums, or the hi-hats all need space in the mix. For example, a producer might sidechain the hi-hat to the kick drum, so that the hi-hat is momentarily attenuated each time the kick drum hits, which can help to create a tighter groove.
Used correctly, sidechaining can add punch to your drums, tighten up your basslines, and make your tops and synths sound bigger and fuller.
Use these four methods to sidechain in Ableton with stock plugins that have great performance and don’t cost extra!