Have an issue with clipping tracks? Do your mixes lack headroom even though none of your channels clip? If so, you may need help with gain staging in Ableton.
This article will explain what it is, why it’s critical to making clean mixes with plenty of headroom, and most importantly how to do it.
Don’t worry, this method won’t be a complex and time-consuming addition to your workflow.
The problem is that almost all music sounds better when it’s louder. And, it’s easy to confuse louder with better. Step-by-step, you may think you’re shaping amazing sounds, while you’re actually just pumping up the volume.
Many producers run super hot signals, thinking their song sounds great. Then, when they listen on a smaller reference system, it’s unrecognizable!
Proper gain staging will help you make more intentional processing decisions. You’ll have greater control over your sounds, and eventually save lots of time in the mixing process. Let’s get to it.
Table of Contents
Gain Staging in Ableton
Gain staging is the process of optimizing the level of a signal along its chain by:
- Setting starting levels to peak at -12dbfs or average at -18dbfs.
- Adjusting gain between each device in the chain to maintain this level.
Gain staging maximizes headroom and dynamic range while minimizing signal degradation.
What is Gain?
Simply put, Gain is the level difference between the input and output of a system.
It’s a measure of an increase in signal amplitude produced by an amplifier or component. Usually this is expressed as the ratio of output to input.
Notably, we are not explicitly talking about volume. Even though the terms get used interchangeably, there are important differences. Namely, in “where,” they play into a signal path.
How different could they be?
Gain vs Volume
Volume, is likely exactly as you’re thinking of it – a measure of the final output of an audio system. A system is anything that makes sound – car speakers, headphones, etc. Adjusting the volume of a sound system won’t affect the quality of signal. Even if the output hardware starts to distort, the signal itself is unaffected.
Chances are, you’ve adjusted gain on amps, channel strips, interfaces, and plugins. You know when you turn up the gain, the signal gets louder. So, if you turn up the gain and you aren’t hitting the limits of the internal system the end result will effectively be just a volume increase. But, if you have a long signal chain, not hitting the sweet spot at input for every device can drastically affect the character of your sound.
This is why an easy and convenient way to think about gain is volume at input. Though this isn’t entirely technically accurate it’s a good razor to grasp how gain staging can impact your sound.
What is Gain Staging?
Gain staging in Ableton is the process of optimizing the level of an audio signal throughout an audio signal chain. This means that the signal gain is adjusted to the correct level at every stage in the signal chain. Hence, the term gain staging.
In short, gain staging is being aware of the level of your signal – of every track in your mix – at every single stage of the processing.
While the examples we’ll use are about electronic music gain staging in Ableton, the concepts here apply to any DAW and can be used for any genre of music.
Why is Gain Staging Important?
Now that we’ve established what gain staging is, here are the reasons why it’s important. Gain staging in Ableton:
- Lets you process sounds as heavily as needed while retaining headroom.
- Helps you gauge how your processing is actually affecting the character of the sound, instead of just the loudness, which in turn…
- Lets you make more intentional processing and mixing decisions.
The goal of gain staging is to minimize noise & distortion while maximizing dynamic range and headroom – the space before we hit the clipping level.
If, at any point, the signal runs too hot, or too soft with analog gear, the signal quality can degrade through noise or distortion.
Before diving into exactly how to gain stage in Ableton. Let’s explore some foundational concepts.
As with most things in modern digital production, the concepts are rooted in the analog past. Since our goal is to maximize headroom – the space before we hit the clipping level – we need to understand the difference between analog and digital clipping.
Analog vs Digital Clipping
Distortion happens when you turn a sound system up beyond its limitations. And different systems distort in different ways.
Most of the time, you want to avoid unwanted distortion. This is especially true in a digital system. We’ve all had the experience of pushing a track or master into the red in Ableton. It’s obvious in a bad way that this needs to be fixed immediately.
It’s not just at the channel level this is important. Without proper gain staging, your individual tracks can be fine, but your master bus can still clip. This can be a frustrating situation of trying to figure out what, and where is causing the clipping.
But, if you’re Using analog or analog-modeled plugins, they actually operate best when the gain hits a sweet spot. And, in fact, some amount of signal degradation can be a good thing.
Let’s take a classic example: distorted guitars.
A guitar signal is pushed over an amplifier’s limits, resulting in a now iconic sound. These distorted guitars are a technically “improper” gain stage. But, obviously, it can be a desired outcome. In modern times, this sweet spot has become a matter of taste.
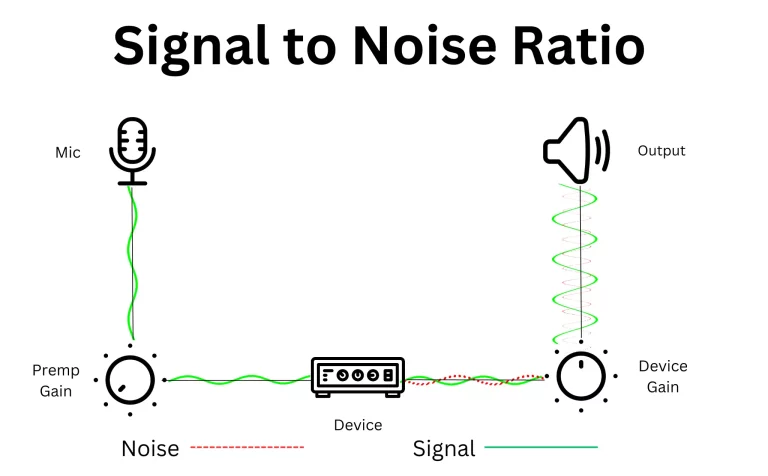
But why do analog (or analog-emulating) have this sweet spot? The answer lies in two characteristics of analog gear: the noise floor and the signal to noise ratio.
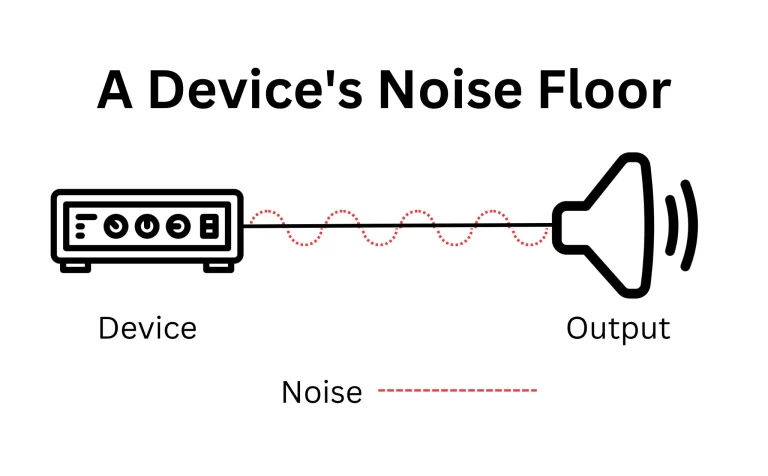
What is the Noise Floor?
The first thing to know is that there is inherent noise created by analog gear.
The “noise floor” refers to this, lowest or “floor” level, of noise present in the audio signal when no external signal is being processed.
It is caused by various factors such as electronic noise, hum, and interference, and it can vary greatly depending on the quality of the gear. In practice, the noise floor of analog gear is usually measured in decibels.
What is the Signal to Noise Ratio?
When you add a signal to a system, like input from a microphone or instrument, you’ll now have both signal (from your input) and noise (from the noise floor).
The difference between the noise floor to signal is what’s called the signal to noise ratio. It is a measure of the strength of the desired signal compared to the amount of unwanted noise. In the context of analog gear, it is a metric that can signify the quality of the gear.
The Signal to Noise Ratio is calculated by subtracting the noise floor of the gear from the maximum level of the audio signal that the gear can handle. The higher the Signal to Noise Ratio, the lower the level of noise in the audio signal, which results in a cleaner and clearer sound.
So, in general the quieter noise floor can be compared to the signal, the better.
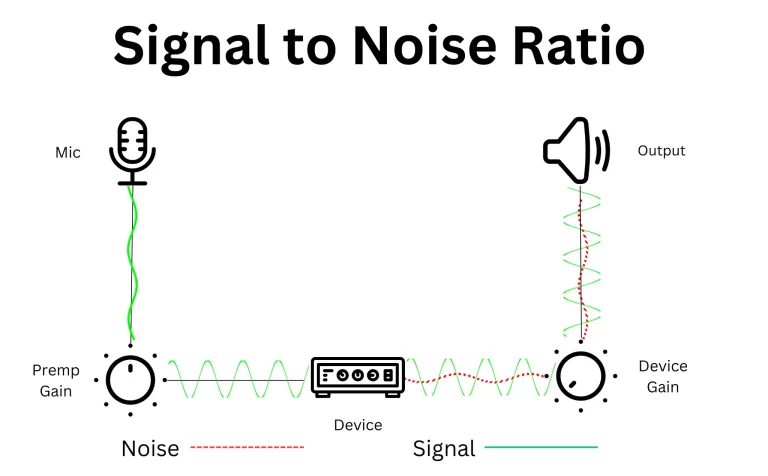
Let’s look at an example where you’re recording vocals through a preamp. If you use the gain on your mic preamp you can control how loud the recording (signal) is.
If you don’t usually work with vocalists, the goal of a pre-amp is to take signals from mics and other inputs and bring them up to line level. Each source needs specific attention, but after you’ve set your pre-amp gain, everything else downstream will operate at line level. If you’re unsure what line level is, check out our article about DIFFERENT volume levels for producers.
So, you’re setting your preamp gain. Obviously you want to avoid turning the signal up too loud, to avoid distortion. But what if it’s too quiet?
Recording too weakly, will make the signal to noise ratio lower. Because the signal is quiet, you’ll likely need to turn up the gain after recording to boost the signal. In that instance you’ll ALSO be boosting the noise. At a high enough level, it would be difficult to work with your signal, because there will be too much noise.
What is Signal Flow?
It’s important to realize that every device adds some amount of noise when considering your signal flow.
This refers to the path a signal takes from its source to its final destination (being summed into the master bus). As a signal goes from the source, through various stages of processing like amps, equalizers, dynamics processors, and effects.
Since each stage adds a bit of noise, without proper gain staging the combined noise floor can cause the quietest signals to be lost in the noise.

How to Gain Stage in Ableton
Armed with these concepts, let’s explore how to practically approach gain staging in ableton.
This process is simple in concept: moving from one plugin into another, adjusting the level of the signal as it leaves that plugin, its level should as it hits your channel fader, group bus, and all the way up to the master.
Setting initial levels before gain staging
Digital systems measure output in decibels full scale or dbfs. You never want to exceed 0 dbfs.
Opinions vary, but shooting for peaks at -12, and averaging about -18 is considered ideal.
And, while there is no definitive answer the general consensus is for your master channel to peak between -6 and -12 so there is enough headroom for mastering.
Analog system levels get set a bit higher, since noise is our main concern. And, as discussed above with analog emulated gear a little bit of clipping can even be desirable.
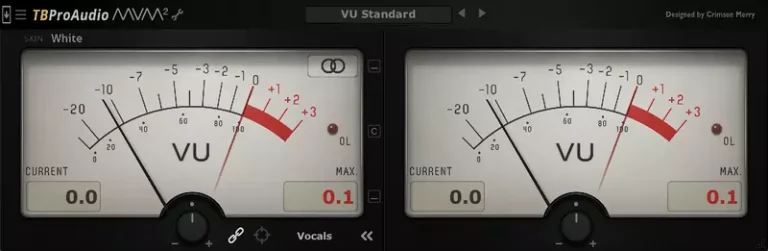
For Analog systems, you’ll want to grab a VU meter like the free mvMeter2 and aim for 0 db vu, which equals +4 db (the standard for line level systems.)
At the end of your signal chain, use a Utility to get the track to the desired level. Every DAW has this function. Logic is called “gain’, or “trim” in others. The point is you do not want to set your track level using the track volume setting.
When you go into the mixing stage, you’ll use the track volume to adjust its position in the mix. You won’t want to affect the gain staging. Similarly if you use any volume automation, you’ll want to use a utility and not the volume adjustment, so that it’s a fixed value.
Another thing to note when using the channel adjusting faders is that you don’t want to use them at too low a level. You’ll notice that they aren’t linear adjustments but logarithmic. This means that the same space that occupies 6 dbs at the top end will occupy 12 dbs toward the bottom. Operating at this bottom range can make it difficult to get fine adjustments.
The simple fix for this is to use a secondary utility as the final device in your signal chain to bring your final mixing volume. Just note that all plugins need to be between these two utilities for this method to be effective.
Peak vs Average Volume
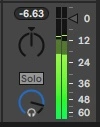
We mentioned that general consensus is getting your master to peak between -6 and -12 dbfs. Another general goal is to aim for -12 peak on your channels., and -18 on overage leaving the volume fader at 0 (called “unity”).
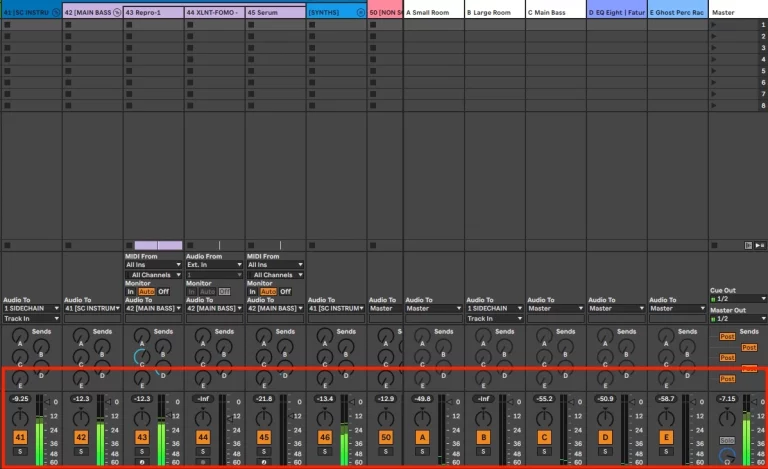
In Ableton you can tell the difference between average and peak by the colors on your fader. Notice the channel meter is split into two different colors. The light color makes up majority of the bar, that indicates your average level. The dark color extends over it, and defines your peak. You can also use the peak meter in session view. As you adjust the levels, you can click the meter to reset it.
Optimizing Gain at Each Stage
There are a lot of places you can adjust the gain of a signal, not just when you record. Each ‘stage’ of your signal chain requires you to optimize the input and output levels.
The first place is the output volume of the audio source. Outputting at about 80%. Means you won’t have to turn it up too much for the signal to be audible. Other stages you may need to adjust the gain are:
- Input preamp: as mentioned before, generally you’ll want your signal to peak around -12dbfs or 0 dbvu
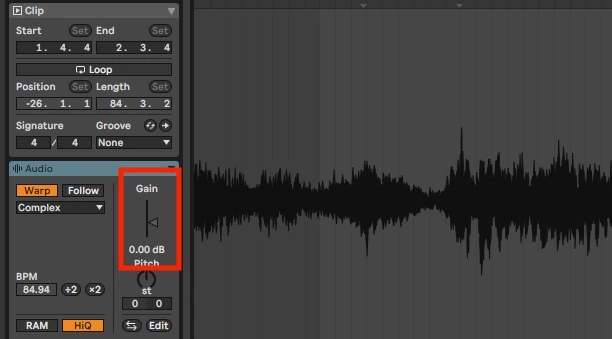
- Clip or region gain: In your daw you can adjust the gain at the clip level to bring it to the appropriate point. This method is most common in stem mixing sessions where you aren’t doing too much processing, and you want to make sure the clip hits the appropriate level.
- EQ: Boosting or cutting frequencies will change the signal’s accordingly. Adjust the gain coming out of this plugin to make up for the increase or decrease in volume.
- Dynamics processing: Most compressors and dynamics processing plugins have an output gain feature that allows you to adjust for the changes made.
- Effects
Adding any plugins can add volume. Use the output gain to get that equivalent level, so that you aren’t tricking your ears into thinking it sounds better, when it’s truly only louder. If it doesn’t have it, put another utility plugin after the fact to re-adjust to the appropriate level. This way you can maintain the levels above so that the signal flows into the next plugin at the sweet spot.
You can test this by grouping your plugins and bypassing the group. If done correctly, it will sit at the same 0dbvu or -12dbfs, or -18dbfs average volume with your signal chain on and bypassed.
This same methodology can be applied if your busses clip. Use utilities to adjust to the sweet spot input for bus processing, and output control to make sure it hits the mixer at the desired range.
Setting Up a Mix Session
These same concepts can help you quickly set up a mix session. If using stems you can adjust the clip gain so that at unity, the clip peaks at about -12dbfs. You can also use a utility to adjust the gain.
Setting all of your channels to this level will ensure you get enough headroom on the master channel.
Another important note: don’t use the master fader as system output. Always keep it at unity. Use the monitor output to adjust the volume.
Gain Staging in Ableton: Conclusion
Gain staging in Ableton is a simple process that can have a critical effect on your sounds and mixes. While it’s not absolute science, they are important guidelines to follow to maximize dynamic range and headroom while minimizing signal degradation from noise or clipping distortion.
The basic process is simple:
- Set your initial signal levels to peak at around -12dbfs, or 0dbvu for analog. Alternately you can aim for -18dbfs as an average level.
- Adjust the gain between each device so you don’t clip anywhere in your signal flow. You can do this using a device’s output gain, or by placing a utility at the end of the signal chain.
- Try to hit the “sweet spot” going into analog modeled plugin.
- Gain stage after you add each plugin.
- Test by grouping and bypassing your signal chain. The peak volume should be the same if you adjusted correctly.
- Target -6 to -12dbfs output on your master channel.
As with most things in production, don’t obsess over technical correctness. Especially with analog devices, a certain amount of clipping to taste and add unique and desirable saturation. After all, rules are made to be broken. But, by knowing why and how we follow the baseline procedures you can make more informed and intentional decisions about your processing and mixing workflow!
If you’re developing your mixing and mastering chops, be sure you’re listening on the appropriate device. Check out our article on the best mixing and mastering headphones for suggestions at all price levels.