
Looking for a way to push your mixes to professional quality that won’t eat up all your studio time? Mixing with pink noise may be the answer!
You’ve probably heard about white noise – that static sound that puts people to sleep. You probably use it as a riser in build ups. It’s cousin, pink noise, is actually a powerful tool that can help you get balanced mixes, fast.
In this article, we’ll explain what pink noise is and give a step-by-step process for how you can apply it to your mixes. This method will give you confidence that your mix is properly balanced. This can be especially helpful mixing modern EDM and pop music tracks where the track acn quickly amass an overwhelming number of tracks.
Put that extra time to writing and production when you’ve cut painstaking hours out of your mixing process. Having spent hundreds of hours mixing tracks, I’m convinced that mixing with pink noise is the fastest way to get your levels correct. Even better, you don’t need any special plugins or tools.
It’s not a cure-all for every mixing ailment. But I’ve found having an arsenal of quick gut-checks, tactics, and razors let me move forward, make progress, and finish tracks. Let’s dive in!
Table of Contents
Mixing with Pink Noise
Mixing with pink noise can achieve a balanced mix extremely quickly. The basic steps are:
- Add a pink noise reference track
- Raise each track’s level until it’s barely audible against the pink noise
- Repeat for each track, one by one
- Remove the pink noise, and un-mute all your tracks
What is Pink Noise?
For practical purposes, pink noise is a noise signal that decreases by about 3 decibels per octave raised.
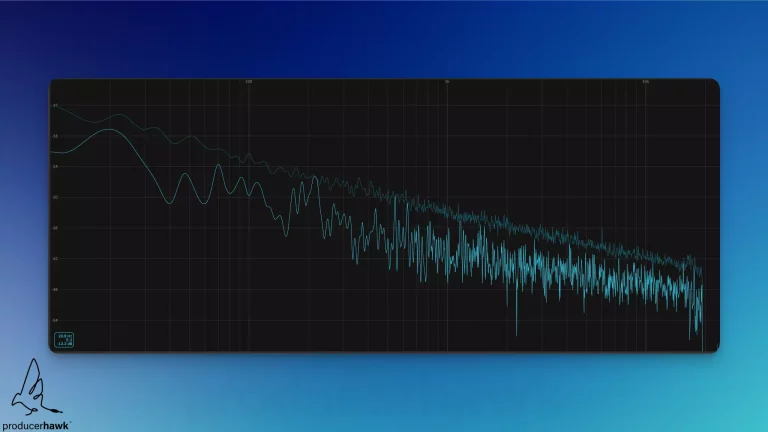
Technically, this is because pink noise has equal audible energy in every octave of the frequency spectrum. This means that as the frequency goes up, the power spectral density (a measure of the power within a frequency) of pink noise goes down. Effectively, this makes the lower octaves louder than the upper octaves.
Sometimes people think that pink noise is calibrated to the human ear’s response, but that’s incorrect. It’s just calibrated to how we hear. I know those two things sound like they are interchangeable, but there is an important difference.
We hear in octaves. Whenever the frequency doubles, we hear that as an octave jump. These octave bands are easier for our brain to understand.
Interestingly, while we hear volume more or less logarithmically, even that curve is imperfect. There are peaks and valleys in the range between 1 – 24 kHz. These are graphed on the Fletcher Munson curve. Using this curve in an EQ can be especially helpful for taking harshness out of particularly unnatural sounds like those found in modern dubstep.
Energy vs Volume
A quick note to clarify that in this context “energy” is not exactly synonymous with “volume”, although the two concepts are related.
“Energy” is how much power is present in a sound wave at a particular frequency.
When we say that pink noise has more energy at lower frequencies than at higher frequencies, we mean that the power of the sound wave is concentrated more in the bass frequencies, and decreases as the frequency increases.
On the other hand, “volume” is a measure of the perceived loudness of a sound. It’s influenced by both the intensity (or amplitude) of the sound wave and the sensitivity of the human ear to different frequencies. This is exactly why it’s useful as a mixing tool, as we’ll explore below.
In practical terms, increasing the energy of a sound wave at lower frequencies will generally make it sound louder or more powerful, which could be interpreted as an increase in volume.
Other "Colors" of Noise
As we mentioned above, there are other “colors” of noise to consider.
Think of the frequency spectrum like the spectrum of visible light. Like there are different colors in a rainbow, there are different types of sounds. Lower frequencies are more red in color and higher frequencies are more blue. Pink tends to fall near the middle.
Other types of noise you may encounter include:
- White noise
- Pink Noise
- Brown noise
- Blue Noise
- Grey Noise
- Violet Noise

White Noise vs Pink Noise
White noise is a noise signal that has equal power at every frequency, giving it a flat power spectral density. In a sound wave, every frequency in the signal has the same energy.
It’s like a “colorless” static sound. It’s called “white” because it’s like white light, which contains all the colors in the visible spectrum in equal proportions.
This characteristic can make it useful in audio engineering, specifically in testing and calibrating sound systems. But, it’s not ideal as a reference for human listening.
As we mentioned above the human ear is more sensitive to specific frequencies. Because the energy in white noise does not decrease as the frequency increases, the higher end can sound louder and harsher to a listener. Because of this, many describe the sound of white noise as a loud “hiss.”
On the other hand, pink noise is more like a color that’s not quite as bright as white. Because the energy decreases in higher frequencies, it is considered less harsh and has a bit more character. Some describe pink noise as more of a “rumble.”
Why you should mix with Pink Noise
Simply, pink noise can help you quickly get a balanced mix that sounds natural and pleasing to the human ear. But why?
Pink noise has a frequency curve similar to many natural sounds. We mentioned the human ear’s sensitivity curve above. For example, signals between 1 – 4 kHz tend to sound loudest at a given intensity. This is why a mix where the hats are too loud can sound especially harsh.
But, the ear is also more sensitive to changes in loudness at lower frequencies. For example, if a mix has too much bass, it can overpower the rest of the mix, or sound muddy, even if the overall loudness of the track is the same as a mix with less bass.
By using pink noise as a reference you can quickly check that the mix has a balanced response.
Once you’re aware of this curve, you can start to notice that across genres, the frequency curves of professional mixes are similar to pink noise’s.
By aligning your octaves to the levels of pink noise, you can approximate this curve quickly, to get a balanced mix.
Guide to Mixing with Pink Noise
Now that you know what pink noise is and why it’s important. Let’s explore how to mix with pink noise. It’s a straightforward process with only 5 basic steps:
- Set up a pink noise reference track
- Loop the loudest section of your song and solo the pink noise
- Unmute one track, raising its level until it’s barely audible against the pink noise
- Repeat or each track
- Remove the pink noise
Set up a Pink Noise reference Track
First things first, get some pink noise.
Don’t have any? We got you!
Download a free sample from us here. Or, if you’d prefer to use a generator, MDA TestTone is a great one.
Sign up to our email list to get a free pink noise sample to use in your own projects!
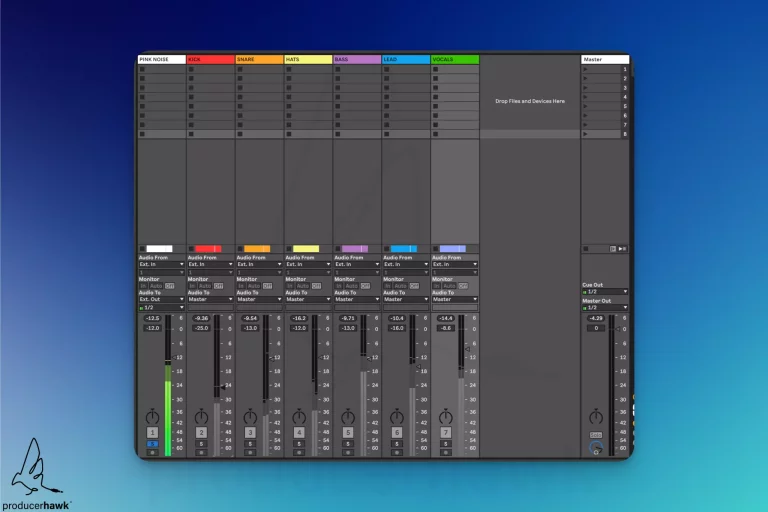
Drop the pink noise into an audio track, and set it up as a reference. In ableton this means, setting it to External Out so it bypasses any processing on your master chain, and adjusting the track volume to -12 dbFS.
Now loop the loudest section of your song, where most of the tracks are playing. Usually this is the chorus or the drop.
And remember, if you’re in a mixing session it’s best practice to mix in mono!

Mute all your tracks
Take down all your tracks so all you can hear is the pink noise. You can do this by either using the mute function, or by lowering the track volume all the way. In this step you can treat groups or busses as an individual track.
Raise one track at a time
Now, with the pink noise playing, select one track and slowly raise the level from 0 until it’s barely audible over the pink noise.
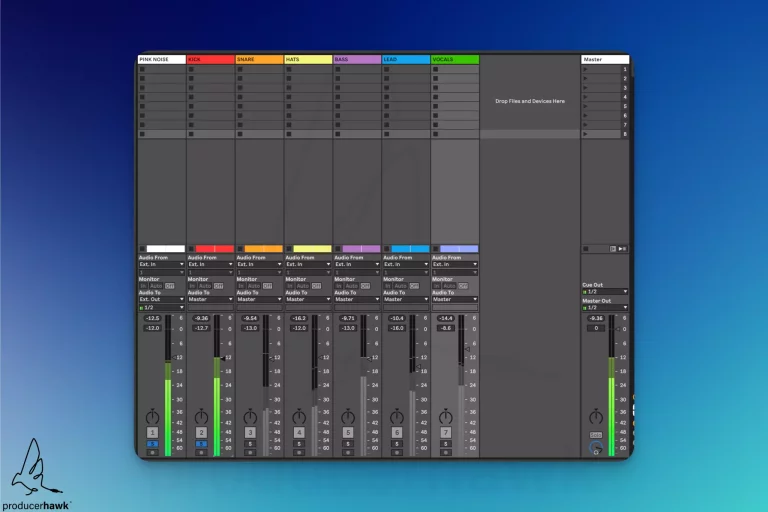
Once the level is set, mute the track again. Repeat this process for each of your tracks.
Remove the pink noise
Once you’ve set the level for each of your tracks, you can remove the pink noise and unmute your tracks. You’ll notice that because you set each level against the pink noise reference, the spectral distribution of your track will closely resemble that of the pink noise.
That’s it! You now have a rough but pretty good balanced mix!
What mixing with Pink Noise is NOT
Mixing with pink noise is a great method for getting a balanced mix. But, it is not a cure-all for every mixing ailment.
Notably, it is not meant to replace training your ears so that you can make informed, intentional, mixing decisions and fine adjustments.
It’s also not the appropriate technique to use when EQ’ing, compressing, or adding other effects.
But, there are a number of other techniques to help you achieve a balanced mix.
Other tactics for a balanced mix
- Mixing in mono is best practice, since the stereo field can trick your brain into perceiving some sounds as louder than others, distorting your mix.
- Proper gain staging helps ensure you avoid clipping and have plenty of headroom going into mastering. Check out our article on gain staging in ableton here.
- Use the correct headphones for your situation. For more information check out our dives on open back vs closed back headphones and our list of the best mixing and mastering headphones.
- Using a reference track lets you compare your mix to other professional mixes in the same style and key.
And, if you’re looking to go deep down the mixing rabbit hole, be sure to check out our list of the best books on mixing and mastering.
Conclusion: Mixing with Pink Noise
Mixing with pink noise can help you get a rough but balanced mix very quickly. To do so:
- Add a pink noise reference track
- Raise each track’s level until it’s barely audible against the pink noise
- Repeat for each track, one by one
- Remove the pink noise, and un-mute all your tracks
As a fast tool, it’s impeccable. But, ultimately, it’s no replacement for mixing by ear.
Some Pros & Cons Include:
| PRO | CON |
|---|---|
| Very fast | Less accurate than mixing by ear |
| Can be good for when your ears are tired | Doesn’t account for hierarchy of elements in a mix |
| Can help you make faster decisions | Doesn’t account for genre-specific mixing styles |
| Great for getting a rough and balanced mix | Not good for a dialed-in final mix |
In the end mixing with pink noise is all about speed.
It can be very helpful to get to a starting place for your mix, very quickly. But the pink noise method won’t replace a full mix session done by ear.